How to print with nGen
To get the best possible quality out of any 3D printing material it’s important to match the slicer settings with the material which is used. On this page we’ll run through the most important settings and suggest good starting values for various printers. If your machine isn’t in our list use the general recommended settings.
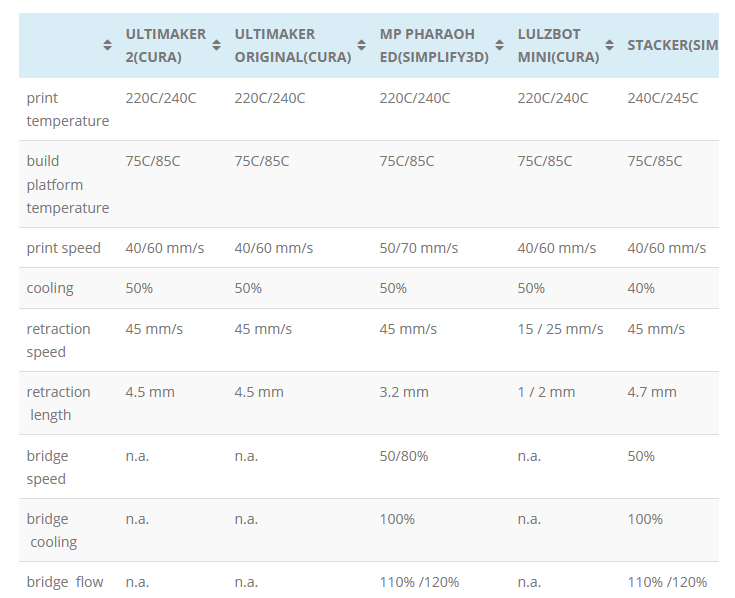
In the table below you can quickly find values for your machine, scroll a bit further down to read more about each settings.
Heated Platform
nGen is best printed on a heated build platform. You want to be near the heat resistance temperature of 85C. Therefor most 3D printers will do fine with 75C/85C platform temperature.
If your machine doesn’t feature a heated platform, then you can look into using accessories such as BuildTak, 3Deeze and 3DLac. For small to medium sized parts the accessories can work, but for large parts covering the entire build platform it most likely will show warping on the bottom of the print.
Printing Temperature
The temperature we set when starting a print really depends on the chosen layerheight and print speed.
Flow of material in mm3/s = (layerheight*nozzle width)*print speed
When considering normal settings such as 0.2mm layerheight and 50 mm/s speed we recommend for most machines a processing temperature of 220C / 240C.
When settings are much different then a regular setup, for instance 0.05mm and 50 mm/s print speed the set temperature could be adjusted. In this case it’s likely that you won’t need as high temperature as in Case 1, because the mm/3 s is 4x less.
Cooling
nGen is a highly efficient material, with elevated glass temperature of 85C but a processing temperature of 220C/240C meaning less heat to dissipate to cool down below glass temperature. It performs great on overhangs, as long as they are still attached to the main model.
If you’re used to setting a 100% fan speed all the time, you might want to experiment with less cooling if you notice layer adhesion or part strength could be better. If a layer cools down too much it will adhere less to the next layer.
We also like the option of only activating layer cooling for the perimeter lines, the infill is not cooled and therefore should maintain best possible layer adhesion.
Bridging
Most slicers will allow users to set special settings when a bridge is printed in a model. Usually we can set bridging speed, bridging cooling and sometimes also bridging perimeter width (or flow).
We recommend slower printing on bridges, since there’s no material to support the printed line we don’t want to ‘break the melt’ by moving too fast. Slowing down the speed when bridging helps retain the melt strength and also allows the printed line to cool down in mid-air.
Cooling can be set at 100% to help the cool down of the first printed lines.
If you can still see the melt break when printing a bridge, try and increase the flow or bridge perimeter width.
Retraction
Before you start tweaking the retraction values make sure you’ve found the sweet spot in terms of printing temperature and speed for your machine.
PLA retraction values should be a good starting value for most machines. One can expect slightly higher values of retraction speed and retraction length.
Coasting is a nice option included in Simplify. This is the act of stopping the extrusion just before a travel move is triggered, this helps get rid of the pressure in the hot-end and therefor also making a retraction move more effective.
We also like the option of only activating layer cooling for the perimeter lines, the infill is not cooled and therefore should maintain best possible layer adhesion.
Minimal layertime
If you’re familiar with the minimal layer time setting then you’ll know this is what causes a printer to slow down when printing fine features on a model. Slowing down the print allows each layer to cool down a minimum amount of time. This is of course different for each material, because it depends on how fast a material can dissipate heat and how much heat needs to be dissipated.
For nGen we reckon you should be able to lower this value compared to your standard PLA value. How much exactly is hard to tell as it depends on the printers cooling efficiency.
Ultimaker Market Place
The Ultimaker Market Place makes it easier for users of the Ultimaker 3 and S5 to use pre-set profiles for third party filaments which have been tested by both the filaments manufacturers and Ultimaker themselves to achieve the best possible user experience.
Important: To choose the optimal nGen settings in the Market Place head to the Eastman entries and choose AM3300, the base material for nGen.


