How to Print with copperFill Filament: The Ultimate Guide for Metallic 3D Printing
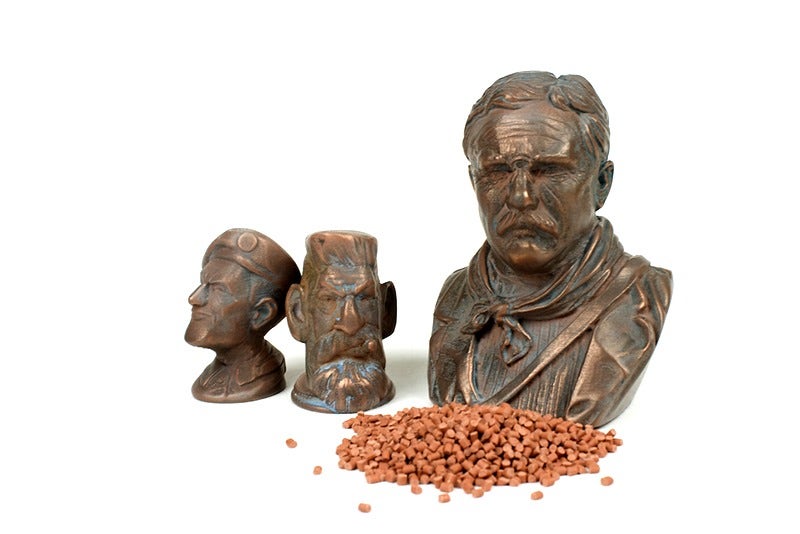
3D printing with metal-infused filaments like copperFill by ColorFabb brings a new dimension to your projects. copperFill is a unique filament that blends PLA with real copper powder, giving your prints the look, feel, and weight of actual metal. With the right settings and techniques, you can create 3D printed objects that closely mimic solid copper, making copperFill ideal for artistic pieces, jewelry, decorative objects, and more.
In this guide, we’ll walk you through everything you need to know about printing with copperFill filament. From setting up your printer to achieving a high-quality metallic finish, this article will help you unlock the full potential of copperFill and create realistic, beautiful prints.
What is copperFill Filament?
Key Characteristics of copperFill
copperFill is a PLA-based filament blended with fine copper powder, providing the appearance and heft of real copper in a material that’s easy to print. Unlike traditional metal printing, copperFill allows you to achieve a metal-like effect without the need for specialized metal 3D printers or high-temperature setups.
copperFill offers several distinct qualities:
- Copper Appearance: The copper powder in the filament gives a genuine copper color and finish, especially when polished.
- Increased Weight: The copper particles make printed parts heavier than typical PLA, giving them a more authentic, solid feel.
- Polishability: copperFill can be sanded and polished to enhance the metallic look, making your prints look more like actual copper objects.
Benefits of Using copperFill Filament
- Realistic Copper Finish: Perfect for projects that need a true metallic look, like jewelry, art, and historical replicas.
- Easy to Print: As a PLA-based filament, copperFill prints at lower temperatures than pure metal filaments, making it accessible for most desktop 3D printers.
- Post-Processing Friendly: copperFill can be polished, sanded, and treated to achieve a range of metallic effects, from matte to a high-gloss shine.
- Unique Aesthetic Appeal: The ability to patina copperFill prints gives them an antique look, adding character to your designs.
Ideal Applications for copperFill
Thanks to its realistic copper finish and polishability, copperFill is perfect for a variety of applications, including:
- Jewelry and Accessories: Ideal for creating copper-like rings, bracelets, and pendants.
- Decorative Art Pieces: Sculptures, statues, and ornaments that benefit from a metallic finish.
- Historical and Artistic Replicas: Reproduce antique items or artifacts with a copper appearance.
- Custom Trophies and Awards: Create unique, weighted awards with a polished or antiqued copper look.
How to Print with copperFill Filament
Printing with copperFill is similar to printing with standard PLA, but due to the copper content, it requires specific settings and preparation to achieve the best results. Here’s a guide to setting up your printer and optimizing your print settings.
1. Recommended Printer Setup
Hardened Steel or Ruby Nozzle
Due to the abrasiveness of copper powder in the filament, it’s essential to use a hardened steel or ruby nozzle instead of a standard brass nozzle. Copper particles can wear down a brass nozzle over time, resulting in inconsistent extrusion and lower print quality.
Nozzle Size
Using a nozzle size of 0.4 mm or larger is recommended. Smaller nozzles may struggle with copperFill’s composite material, leading to clogging or inconsistent flow. A 0.6 mm nozzle can be beneficial for better filament flow and improved reliability during longer prints.
Heated Bed
Though copperFill is PLA-based and doesn’t require extreme bed temperatures, using a heated bed can improve adhesion and reduce warping. Set the bed temperature to around 50°C to 60°C to ensure a stable first layer.
2. Optimal Temperature Settings
Extruder Temperature
The recommended extruder temperature for copperFill is between 190°C and 220°C. Start at around 200°C and adjust as needed based on your printer’s behavior. If you notice under-extrusion, try increasing the temperature slightly. Avoid going too high, as this can cause stringing and reduce the finish quality.
Bed Temperature
A bed temperature of 50°C to 60°C is ideal for copperFill. This helps the filament adhere to the bed effectively, especially for larger or more detailed prints. If you’re experiencing adhesion issues, a light layer of glue stick or painter’s tape can help.
3. Print Speed and Retraction Settings
Print Speed
For copperFill, a slower print speed is recommended to ensure consistent extrusion and a smooth surface finish. A speed of 30-40 mm/s works well for most prints. Going slower helps prevent under-extrusion and improves layer adhesion, leading to a better overall print quality.
Retraction Settings
Set a retraction distance of 1-2 mm with a retraction speed of 20-30 mm/s. Excessive retraction can lead to clogs, especially in metal-filled filaments. Adjust the retraction settings to minimize stringing without risking jams.
4. Layer Height and Extrusion Settings
Layer Height
A layer height of 0.2 mm is recommended for copperFill, offering a good balance between print detail and speed. If your design requires more detail, you can go down to 0.1 mm. For larger parts where speed is a priority, 0.3 mm can be used.
Extrusion Multiplier (Flow Rate)
An extrusion multiplier of 100% is typically effective, but depending on your printer, you may need to slightly adjust it to achieve consistent flow. Avoid over-extrusion, as it can create a rough surface that requires more sanding and polishing.
Post-Processing Techniques for a Realistic Copper Finish
One of the most appealing aspects of using copperFill is the ability to post-process prints to look like genuine copper. Here’s how to achieve a beautiful, realistic metallic finish.
Sanding and Polishing
-
Start with Coarse Sandpaper (120-240 grit): Begin sanding your print with coarse sandpaper to remove visible layer lines and create a smooth base. Be gentle to avoid distorting delicate parts.
-
Progress to Finer Grits (400-1000 grit): Move on to medium and then fine grit sandpaper to further smooth the surface. Wet sanding at this stage can help achieve a more refined finish and prevent dust.
-
Polish with Steel Wool or a Polishing Compound: For a metallic shine, use steel wool or a polishing compound. Gently buff the surface until it begins to reflect light and resemble polished copper.
-
Buff for High Gloss: For a mirror-like finish, use a microfiber cloth or a rotary tool with a buffing attachment. Polishing with a fine compound will give your print a high-gloss, authentic copper look.
Tumbling for Uniform Polishing
Using a rock tumbler with a polishing media, such as walnut shells or ceramic media, can provide a more even polish across the entire print. Place the copperFill print in the tumbler for several hours to achieve a smooth, uniform finish. Tumbling is especially effective for smaller parts like jewelry or decorative items.
Applying Patina for an Aged Look
To give your copperFill print an antique or aged appearance, you can apply a patina effect:
-
Apply a Patina Solution or Dark Paint: Patina solutions designed for copper can give your print a weathered look, while dark acrylic paint can mimic a natural aged effect. Brush it on and let it sit briefly.
-
Wipe Away Excess: After the solution or paint has set for a few minutes, wipe away the excess, leaving color in the crevices. This creates an aged appearance that highlights the print’s details.
-
Seal with a Clear Coat (Optional): For added protection, apply a clear coat. This will preserve the patina and prevent oxidation or further changes over time.
Troubleshooting Common Issues with copperFill
Issue: Under-Extrusion
Solution: Increase the extruder temperature slightly or reduce print speed. Also, ensure your nozzle is not clogged, as composite filaments like copperFill can sometimes leave residue in the nozzle.
Issue: Nozzle Wear
Solution: copperFill is abrasive, so always use a hardened steel or ruby nozzle. Regularly check your nozzle for signs of wear, as an eroded nozzle can lead to inconsistent extrusion and poor print quality.
Issue: Poor Bed Adhesion
Solution: Raise the bed temperature slightly or use an adhesive (such as a glue stick or painter’s tape) to improve adhesion. Adding a brim can also help with adhesion for larger prints.
Issue: Rough Surface Finish
Solution: If the surface is rough, try lowering the print speed and check that your extrusion multiplier is set correctly. Sanding and polishing after printing can also smooth out any imperfections.
Recommended Slicer Settings for copperFill
For slicers like Cura, PrusaSlicer, or Simplify3D, use these recommended settings and adjust as necessary for your printer:
- Extruder Temperature: 190°C - 220°C
- Bed Temperature: 50°C - 60°C
- Print Speed: 30 - 40 mm/s
- Layer Height: 0.2 mm
- Retraction Distance: 1 - 2 mm
- Retraction Speed: 20 - 30 mm/s
- Extrusion Multiplier: 100%
Printing with copperFill allows you to create impressive, metal-like objects with realistic copper characteristics. By following these tips and settings, and incorporating post-processing techniques, you can produce professional-quality prints that stand out for their appearance and weight. Whether you’re crafting jewelry, art, or historical replicas, copperFill provides a unique way to bring a metallic touch to your 3D printing projects.